SMD82 Smart Programming
Configuration Variables (CVs) provide the means for customized operation. “Smart” programming is a term used to describe a method to easily program CVs. The concept of Smart programming is to facilitate configuring the product without having to actually program individual CVs using the programming track or Operations mode programming. The CVs required to be programmed are automatically done by just using switch commands from the throttle.
For the purpose of this discussion, "throttle" refers to any device that can issue or send switch commands. "c" refers to Close or Normal switch position. "t" refers to Throw or Reverse switch position.
Reset the SMD82 to factory defaults.
To “reset” the SMD82 to factory defaults, turn power on and wait until LED 1 (red) turns off (5 - 6 seconds). Then press the “Smart” button and continue to hold the button down (at least 16 seconds) until both LED 1 & 2 are alternately flashing. Release the button. The SMD82 will now restart.
Programming addresses
To start programming, connect the SMD82 power terminals to track power. Turn on power and wait until the LED turns off.
Reset the SMD82 to factory default if previously programmed.
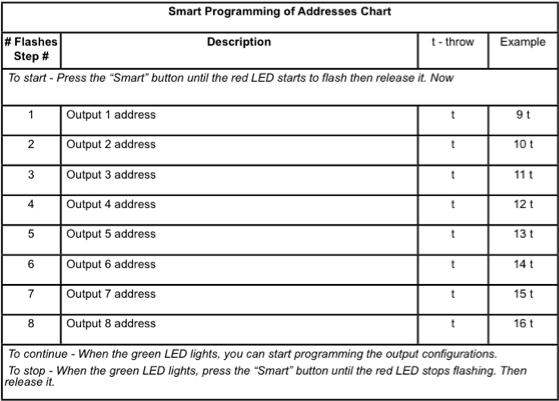
1. Press the “Smart” program button and hold it down for approximately one second until LED1 (red) starts to flash. Then release it.
2. Using the throttle select the switch address you want for output 1 and issue a throw (reverse) command. The green LED will flash briefly. The red LED now flashes twice with a pause and then repeats indicating that the output 2 address is ready to be programmed.
3. Again using the throttle select the switch address you want for output 2 and issue a throw (reverse) command. The red flashes three times with a pause and then repeats indicating that the output 3 address is ready to be programmed.
4. Repeat step three until you have programmed all the output addresses. The red LED flashes increase indicating the output number. When all the output addresses have been programmed the green LED will turn on and the red LED will be flashing.
Exit “Smart” programming mode by pressing the button for approximately one second until the red LED stops flashing. Then release it

Programming output configurations
To change the output configuration, start from one of two places:
1A. Continue from the address section - the red LED is flashing and the green LED is on.
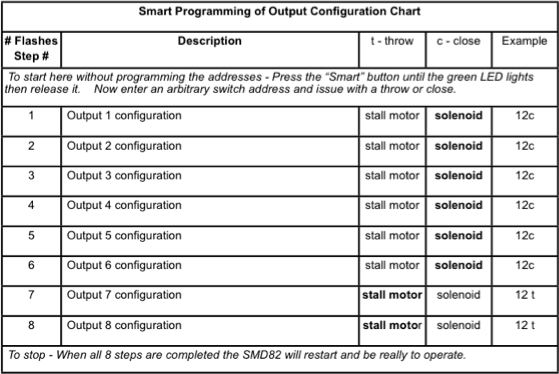
1B. With power on and the red LED off, press the “Smart” program button and hold it down for approximately two seconds until the green LED lights. Then release it.
2. Using the throttle select any switch address you want. Issue a throw (reverse) command to configure output 1 for a stall motor or a close (normal) command to configure it for a solenoid motor. At this point the green LED turns off.
The red LED now flashes twice with a pause and then repeats indicating that the output 2 address is ready to be programmed.
3. Again using the throttle, issue a throw (reverse) command to configure output 2 for a stall motor or a close (normal) command to configure it for a solenoid motor.
Now the red flashes three times with a pause and then repeats indicating that the output 3 address is ready to be programmed.
4. Repeat step three until you have programmed all the output configurations. The red LED flashes increase indicating the output number. When all the output addresses have been programmed SMD82 will restart.

